[TIL] State 정의 와 Router Props
State를 정의하는 두 가지 방법
Constructor를 이용하여 정의하기
React에서 Component를 생성할 때 state 값을 초기화하거나 메서드를 바인딩 할 때 Construcotr를 사용한다. React의 Component의 생성자는 해당 Component가 마운트 되기 전 호출한다
import React, { Component } from 'react'

class App extends Component {
  constructor(props) {
    super(props)

    this.state = {
      name: 'YUN',
      age: 20,
      country: 'KR',
    }
  }

  render() {
    return (
      <div>
        {this.state.name} {this.state.age} {this.state.country}
      </div>
    )
  }
}

export default App
생성자를 통해 state를 쓰는 이유는?
Constructor의 파라미터의 props라는 인자를 사용하여 바로 부모 컴포넌트로부터 전달받는 **속성(properties)**을 사용할 수 있다. 자주 사용하는 기법은 아니지만 간혹 부모 컴포넌트로부터 전달받은 props를 이용해 자기 자신 컴포넌트의 state를 초기화해야 할 때가 있을 때 Constructor를 사용한다. 예를 들어
class App extends React.Component {
  constructor(props) {
    super(props);
    const {
      location: { pathname },
    } = props;

    this.state = {
      result: null,
      error: null,
      loading: true,
      isMovie: pathname.includes("/movie/")
    };
  }
Constructor를 이용하지 않고 정의하기
import React, { Component } from 'react';

class App extends Component {
  this.state = {
    name: 'YUN',
    age: 20,
    country: 'KR'
  }

  render() {
    return <div>{this.state.name} {this.state.age} {this.state.country}</div>;
  }
}

export default App;
위 코드와 같이 클래스 컴포넌트에 바로 this.state를 사용하여 state를 정의 하면된다 두 가지 방법은 사실상 동일하여 결과물이 같다 사용 용도에 따라 나뉘게 된다 props를 이용하여 정보를 받아와서 state를 초기화해야 할 경우는 **생성자(Constructor)**를 이용한다.
Router Props
브라우저와 리액트앱의 라우터를 연결하게 되면 그 결과 라우터가 history api에 접근할 수 있게 되며 각각의 Route와 연결된 컴포넌트에 props로 match, location, history라는 객체를 전달하게 된다.
Match
match 객체에는 Route path와 URL이 매칭된 대한 정보가 담겨져있다. 대표적으로 match.params로 path에 설정한 파라미터값을 가져올 수 있다.

path : [string] 라우터에 정의된 path
url : [string] 실제 클라이언트로부터 요청된 url path
isExact : [boolean] true일 경우 전체 경로가 완전히 매칭될 경우에만 요청을 수행
params : [JSON object] url path로 전달된 파라미터 객체
Location
location 객체는 현재 페이지의 정보를 가지고 있으며 대표적으로 location.search로 현재 url의 쿼리 스트링을 가져올 수 있다.

요청 URL

console.log(this.props.location)
pathname : [string] 현재 페이지의 경로명
search : [string] 현재 페이지의 query string
hash : [string] 현재 페이지의 hash
History
history 객체는 현재까지 이동한 url 경로들이 담겨있는 형태로 주소를 임의로 변경하거나 되돌아갈 수 있도록 해준다. 이 객체를 통하여, 우리가 컴포넌트 내에 구현하는 메소드에서 라우터에 직접 접근을 할 수 있습니다 뒤로가기, 특정 경로로 이동, 이탈 방지 등..
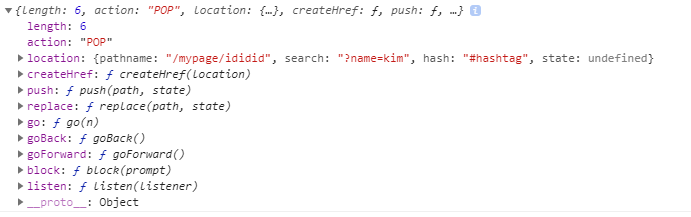
console.log(this.props.history)
length : [number] 전체 history 스택의 길이
action : [string] 최근에 수행된 action (PUSH, REPLACE or POP)
location : [JSON object] 최근 경로 정보
push(path, [state]) : [function] 새로운 경로를 history 스택으로 푸시하여 페이지를 이동
replace(path, [state]) : [function] 최근 경로를 history 스택에서 교체하여 페이지를 이동
go(n) : [function] : history 스택의 포인터를 n번째로 이동
goBack() : [function] 이전 페이지로 이동
goForward() : [function] 앞 페이지로 이동
block(prompt) : [function] history 스택의 PUSH/POP 동작을 제어